Resetting Meta data of a RAX Rackspace Xen Server

At work we had some customers complaining of metadata not being removed on their servers.


nova --os-username username --os-password apigoeshere meta uuidgoeshere delete rax:reboot_window

It was pretty simple to do as a one liner right.

But imagine we have a list.txt full of 100 servers that need clearing for an individual customer, that would be a nightmare to do manually like above. so we can do it like:

for server in $(cat list.txt); do nova --os-username username --os-password apikeygoeshere meta $server delete rax:reboot_window; done

Now that is pretty cool. And saved me and my colleagues a lot of time.

Testing the consistency of response time on a website

So, we had some customers today complaining about inconsistent page load times. So I taken a look at the hypervisor they were on and I could see it was really quite busy. In the sense that all 122GB of RAM available was being used by server instances. Ironically though it wasn’t that busy, but I live-migrated the customer anyway to a much quieter server, but the customer saw no change whatsoever.

In this case it indicated already that it wasn’t a network infrastructure or hardware issue and likely the increase in latency they saw over the last so many days was being caused by something else. Most likely the growing size of their database, not being reflected by their static amount of ram and the variables set for their tablesize cache, and etc in MySQL.

So my friend kindly put together this excellent oneliner. Check it out!

$ for i in $(seq 50); do curl -sL http://www.google.com/ -o /dev/null -w %{time_total}\\n; sleep 1; done
0.698
0.493
0.365
0.293
0.326
0.525
0.342
0.527
0.445
0.263
0.493

Pretty neat eh

Using configdrive cloud-config to execute commands post server creation

A lot of customers might want to setup automation, for installing common packages and making configurations for vanilla images. One way to provide that automation is to use configdrive which allows you to execute commands post server creation, as well as to install certain packages that are required.

The good thing about using this is you can get a server up and running with a single line of automation, and of course your configuration file (which contains all the automation). Here is the steps you need to do it, and it is actually really rather very simple!

Step 1. Create Automation File .cloud-config

#cloud-config

packages:

 - apache2
 - php5
 - php5-mysql
 - mysql-server

runcmd:

 - wget http://wordpress.org/latest.tar.gz -P /tmp/
 - tar -zxf /tmp/latest.tar.gz -C /var/www/
 - mysql -e "create database wordpress; create user 'wpuser'@'localhost' identified by 'changemetoo'; grant all privileges on wordpress . \* to 'wpuser'@'localhost'; flush privileges;"
 - mysql -e "drop database test; drop user 'test'@'localhost'; flush privileges;"
 - mysqladmin -u root password 'changeme'

Install apache2, php5, php-mysql, mysqlserver, download wordpress to /tmp and then extract it into main /var/www folder. Create the wordpress database and user name.

Step 2: Create server using cloud-config in Supernova via the Rackspace API
(not hard! easy!)

supernova customer boot --config-drive=true --flavor performance1-1 --image 09de0a66-3156-48b4-90a5-1cf25a905207 --user-data cloud-config testing-configdrive


+--------------------------------------+-------------------------------------------------------------------------------+
| Property                             | Value                                                                         |
+--------------------------------------+-------------------------------------------------------------------------------+
| OS-DCF:diskConfig                    | MANUAL                                                                        |
| OS-EXT-STS:power_state               | 0                                                                             |
| OS-EXT-STS:task_state                | scheduling                                                                    |
| OS-EXT-STS:vm_state                  | building                                                                      |
| RAX-PUBLIC-IP-ZONE-ID:publicIPZoneId |                                                                               |
| accessIPv4                           |                                                                               |
| accessIPv6                           |                                                                               |
| adminPass                            | SECUREPASSWORDHERE                                                            |
| config_drive                         | True                                                                          |
| created                              | 2015-10-20T11:10:23Z                                                          |
| flavor                               | 1 GB Performance (performance1-1)                                             |
| hostId                               |                                                                               |
| id                                   | ef084d0f-70cc-4366-b348-daf987909899                                          |
| image                                | Ubuntu 14.04 LTS (Trusty Tahr) (PVHVM) (09de0a66-3156-48b4-90a5-1cf25a905207) |
| key_name                             | -                                                                             |
| metadata                             | {}                                                                            |
| name                                 | testing-configdrive                                                           |
| progress                             | 0                                                                             |
| status                               | BUILD                                                                         |
| tenant_id                            | 10000000                                                                      |
| updated                              | 2015-10-20T11:10:24Z                                                          |
| user_id                              | 05b18e859cad42bb9a5a35ad0a6fba2f                                              |
+--------------------------------------+-------------------------------------------------------------------------------+

In my case my supernova was setup already, however I have another article on how to setup supernova on this site, just take a look there for how to install it. MY supernova configuration looks like (with the API KEY removed ofcourse!)

[customer]
OS_AUTH_URL=https://identity.api.rackspacecloud.com/v2.0/
OS_AUTH_SYSTEM=rackspace
#OS_COMPUTE_API_VERSION=1.1
NOVA_RAX_AUTH=1
OS_REGION_NAME=LON
NOVA_SERVICE_NAME=cloudServersOpenStack
OS_PASSWORD=90bb3pd0a7MYMOCKAPIKEYc419572678abba136a2
OS_USERNAME=mycloudusername
OS_TENANT_NAME=100000

OS_TENANT_NAME is your customer number, take it from the url in mycloud.rackspace.com after logging on. OS_PASSWORD is your API KEY, get it from the account settings url in mycloud.rackspace.co.uk, and your OS_USERNAME, that is your username that you use to login to the Rackspace mycloud control panel. Simples!

Step 3: Confirm your server built as expected

root@testing-configdrive:~# ls /tmp
latest.tar.gz

root@testing-configdrive:~# ls /var/www/wordpress
index.php    readme.html      wp-admin            wp-comments-post.php  wp-content   wp-includes        wp-load.php   wp-mail.php      wp-signup.php     xmlrpc.php
license.txt  wp-activate.php  wp-blog-header.php  wp-config-sample.php  wp-cron.php  wp-links-opml.php  wp-login.php  wp-settings.php  wp-trackback.php

In my case, I noticed that everything went fine and ‘wordpress’ installed to /var/www just fine. But what if I wanted wordpress www dir configured to html by default? That’s pretty easy. It’s just an extra.

mv /var/www/html /var/www/html_old
mv /var/www/wordpress /var/www/html

So lets add that to our automation script:

#cloud-config

packages:

 - apache2
 - php5
 - php5-mysql
 - mysql-server

runcmd:

 - wget http://wordpress.org/latest.tar.gz -P /tmp/
 - tar -zxf /tmp/latest.tar.gz -C /var/www/; mv /var/www/html /var/www/html_old; mv /var/www/wordpress /var/www/html
 - mysql -e "create database wordpress; create user 'wpuser'@'localhost' identified by 'changemetoo'; grant all privileges on wordpress . \* to 'wpuser'@'localhost'; flush privileges;"
 - mysql -e "drop database test; drop user 'test'@'localhost'; flush privileges;"
 - mysqladmin -u root password 'changeme'

Job done. Just a case of re-running the command now:

supernova customer boot --config-drive=true --flavor performance1-1 --image 09de0a66-3156-48b4-90a5-1cf25a905207 --user-data cloud-config testing-configdrive

And then checking that our wordpress website loads correctly without any additional configuration or having to login to the machine! Not bad automation thar.

I could have quite easily achieved something like this by using the API directly. No supernova and no filesystem. Just the raw command! Yeah that’d be better than not bad!

Creating Post BUILD Automation thru API via CURL

Here’s how to do it.

Step 1. Prepare your execution script by converting it to BASE_64 character encoding

Unencoded Script:

#cloud-config

packages:

 - apache2
 - php5
 - php5-mysql
 - mysql-server

runcmd:

 - wget http://wordpress.org/latest.tar.gz -P /tmp/
 - tar -zxf /tmp/latest.tar.gz -C /var/www/; mv /var/www/html /var/www/html_old; mv /var/www/wordpress /var/www/html
 - mysql -e "create database wordpress; create user 'wpuser'@'localhost' identified by 'changemetoo'; grant all privileges on wordpress . \* to 'wpuser'@'localhost'; flush privileges;"
 - mysql -e "drop database test; drop user 'test'@'localhost'; flush privileges;"
 - mysqladmin -u root password 'changeme'

Encoded Script:

I2Nsb3VkLWNvbmZpZw0KDQpwYWNrYWdlczoNCg0KIC0gYXBhY2hlMg0KIC0gcGhwNQ0KIC0gcGhwNS1teXNxbA0KIC0gbXlzcWwtc2VydmVyDQoNCnJ1bmNtZDoNCg0KIC0gd2dldCBodHRwOi8vd29yZHByZXNzLm9yZy9sYXRlc3QudGFyLmd6IC1QIC90bXAvDQogLSB0YXIgLXp4ZiAvdG1wL2xhdGVzdC50YXIuZ3ogLUMgL3Zhci93d3cvIDsgbXYgL3Zhci93d3cvaHRtbCAvdmFyL3d3dy9odG1sX29sZDsgbXYgL3Zhci93d3cvd29yZHByZXNzIC92YXIvd3d3L2h0bWwNCiAtIG15c3FsIC1lICJjcmVhdGUgZGF0YWJhc2Ugd29yZHByZXNzOyBjcmVhdGUgdXNlciAnd3B1c2VyJ0AnbG9jYWxob3N0JyBpZGVudGlmaWVkIGJ5ICdjaGFuZ2VtZXRvbyc7IGdyYW50IGFsbCBwcml2aWxlZ2VzIG9uIHdvcmRwcmVzcyAuIFwqIHRvICd3cHVzZXInQCdsb2NhbGhvc3QnOyBmbHVzaCBwcml2aWxlZ2VzOyINCiAtIG15c3FsIC1lICJkcm9wIGRhdGFiYXNlIHRlc3Q7IGRyb3AgdXNlciAndGVzdCdAJ2xvY2FsaG9zdCc7IGZsdXNoIHByaXZpbGVnZXM7Ig0KIC0gbXlzcWxhZG1pbiAtdSByb290IHBhc3N3b3JkICdjaGFuZ2VtZSc=

Step 2: Get Authorization token from identity API endpoint

Command:


$ curl -s https://identity.api.rackspacecloud.com/v2.0/tokens -X 'POST'        -d '{"auth":{"passwordCredentials":{"username":"adambull", "password":"superBRAIN%!7912105!"}}}'        -H "Content-Type: application/json"

Response:

{"access":{"token":{"id":"AAD4gu67KlOPQeRSTJVC_8MLrTomBCxN6HdmVhlI4y9SiOa-h-Ytnlls2dAJo7wa60E9nQ9Se0uHxgJuHayVPEssmIm--MOCKTOKEN_EXAMPLE-0Wv5n0ZY0A","expires":"2015-10-21T15:06:44.577Z"

It’s also possible to use your API Key to retrieve the TOKEN ID used by API:
(if you don’t like using your control panel password!)

curl -s https://identity.api.rackspacecloud.com/v2.0/tokens -X 'POST' \
       -d '{"auth":{"RAX-KSKEY:apiKeyCredentials":{"username":"yourUserName", "apiKey":"yourApiKey"}}}' \
       -H "Content-Type: application/json" | python -m json.tool

Step 3: Construct Script to Execute Command directly thru API


#!/bin/sh

# Your Rackspace ACCOUNT DDI, look for a number like below when you login to the Rackspace mycloud controlpanel
account='10000000'

# Using the token that was returned to us in step 2
token="AAD4gu6FH-KoLCKiPWpqHONkCqGJ0YiDuO6yvQG4J1jRSjcQoZSqRK94u0jaYv5BMOCKTOKENpMsI3NEkjNqApipi0Lr2MFLjw"

# London Datacentre Endpoint, could by SYD, IAD, ORD, DFW etc
curl -v https://lon.servers.api.rackspacecloud.com/v2/$account/servers \
       -X POST \
       -H "X-Auth-Project-Id: $account" \
       -H "Content-Type: application/json" \
       -H "Accept: application/json" \
       -H "X-Auth-Token: $token" \
       -d '{"server": {"name": "testing-cloud-init-api", "imageRef": "09de0a66-3156-48b4-90a5-1cf25a905207", "flavorRef": "general1-1", "config_drive": "true", "user_data": "I2Nsb3VkLWNvbmZpZw0KDQpwYWNrYWdlczoNCg0KIC0gYXBhY2hlMg0KIC0gcGhwNQ0KIC0gcGhwNS1teXNxbA0KIC0gbXlzcWwtc2VydmVyDQoNCnJ1bmNtZDoNCg0KIC0gd2dldCBodHRwOi8vd29yZHByZXNzLm9yZy9sYXRlc3QudGFyLmd6IC1QIC90bXAvDQogLSB0YXIgLXp4ZiAvdG1wL2xhdGVzdC50YXIuZ3ogLUMgL3Zhci93d3cvIDsgbXYgL3Zhci93d3cvaHRtbCAvdmFyL3d3dy9odG1sX29sZDsgbXYgL3Zhci93d3cvd29yZHByZXNzIC92YXIvd3d3L2h0bWwNCiAtIG15c3FsIC1lICJjcmVhdGUgZGF0YWJhc2Ugd29yZHByZXNzOyBjcmVhdGUgdXNlciAnd3B1c2VyJ0AnbG9jYWxob3N0JyBpZGVudGlmaWVkIGJ5ICdjaGFuZ2VtZXRvbyc7IGdyYW50IGFsbCBwcml2aWxlZ2VzIG9uIHdvcmRwcmVzcyAuIFwqIHRvICd3cHVzZXInQCdsb2NhbGhvc3QnOyBmbHVzaCBwcml2aWxlZ2VzOyINCiAtIG15c3FsIC1lICJkcm9wIGRhdGFiYXNlIHRlc3Q7IGRyb3AgdXNlciAndGVzdCdAJ2xvY2FsaG9zdCc7IGZsdXNoIHByaXZpbGVnZXM7Ig0KIC0gbXlzcWxhZG1pbiAtdSByb290IHBhc3N3b3JkICdjaGFuZ2VtZSc="}}' \
      | python -m json.tool

Zomg what does this mean?

X-Auth-Token: is just the header that is sent to authorise your request. You got the token using your mycloud username and password, or mycloud username and API key in step 2.
ImageRef: this is just the ID assigned to the base image of Ubuntu LTS 14.04. Take a look below at all the different images you can use (and the image id of each):

$ supernova customer image-list

| ade87903-9d82-4584-9cc1-204870011de0 | Arch 2015.7 (PVHVM)                                          | ACTIVE |                                      |
| fdaf64c7-d9f3-446c-bd7c-70349305ae91 | CentOS 5 (PV)                                                | ACTIVE |                                      |
| 21612eaf-a350-4047-b06f-6bb8a8a7bd99 | CentOS 6 (PV)                                                | ACTIVE |                                      |
| fabe045f-43f8-4991-9e6c-5cabd617538c | CentOS 6 (PVHVM)                                             | ACTIVE |                                      |
| 6595f1b7-e825-4bd2-addc-c7b1c803a37f | CentOS 7 (PVHVM)                                             | ACTIVE |                                      |
| 2c12f6da-8540-40bc-b974-9a72040173e0 | CoreOS (Alpha)                                               | ACTIVE |                                      |
| 8dc7d5d8-4ad4-41b6-acf1-958dfeadcb17 | CoreOS (Beta)                                                | ACTIVE |                                      |
| 415ca2e6-df92-44e6-ba95-8ee36b436b24 | CoreOS (Stable)                                              | ACTIVE |                                      |
| eaaf94d8-55a6-4bfa-b0a8-473febb012dc | Debian 7 (Wheezy) (PVHVM)                                    | ACTIVE |                                      |
| c3aacaf9-8d1e-4d41-bb47-045fbc392a1c | Debian 8 (Jessie) (PVHVM)                                    | ACTIVE |                                      |
| 081a8b12-515c-41c9-8ce4-13139e1904f7 | Debian Testing (Stretch) (PVHVM)                             | ACTIVE |                                      |
| 498c59a0-3c26-4357-92c0-dd938baca3db | Debian Unstable (Sid) (PVHVM)                                | ACTIVE |                                      |
| 46975098-7799-4e72-8ae0-d6ef9d2d26a1 | Fedora 21 (PVHVM)                                            | ACTIVE |                                      |
| 0976b31e-f6d7-4d74-81e9-007fca25067e | Fedora 22 (PVHVM)                                            | ACTIVE |                                      |
| 7a1cf8de-7721-4d56-900b-1e65def2ada5 | FreeBSD 10 (PVHVM)                                           | ACTIVE |                                      |
| 7451d607-426d-416f-8d29-97e57f6f3ad5 | Gentoo 15.3 (PVHVM)                                          | ACTIVE |                                      |
| 79436148-753f-41b7-aee9-5acbde16582c | OpenSUSE 13.2 (PVHVM)                                        | ACTIVE |                                      |
| 05dd965d-84ce-451b-9ca1-83a134e523c3 | Red Hat Enterprise Linux 5 (PV)                              | ACTIVE |                                      |
| 783f71f4-d2d8-4d38-b2e1-8c916de79a38 | Red Hat Enterprise Linux 6 (PV)                              | ACTIVE |                                      |
| 5176fde9-e9d6-4611-9069-1eecd55df440 | Red Hat Enterprise Linux 6 (PVHVM)                           | ACTIVE |                                      |
| 92f8a8b8-6019-4c27-949b-cf9910b84ffb | Red Hat Enterprise Linux 7 (PVHVM)                           | ACTIVE |                                      |
| 36076d08-3e8b-4436-9253-7a8868e4f4d7 | Scientific Linux 6 (PVHVM)                                   | ACTIVE |                                      |
| 6118e449-3149-475f-bcbb-99d204cedd56 | Scientific Linux 7 (PVHVM)                                   | ACTIVE |                                      |
| 656e65f7-6441-46e8-978d-0d39beaaf559 | Ubuntu 12.04 LTS (Precise Pangolin) (PV)                     | ACTIVE |                                      |
| 973775ab-0653-4ef8-a571-7a2777787735 | Ubuntu 12.04 LTS (Precise Pangolin) (PVHVM)                  | ACTIVE |                                      |
| 5ed162cc-b4eb-4371-b24a-a0ae73376c73 | Ubuntu 14.04 LTS (Trusty Tahr) (PV)                          | ACTIVE |                                      |
| ***09de0a66-3156-48b4-90a5-1cf25a905207*** | Ubuntu 14.04 LTS (Trusty Tahr) (PVHVM)                       | ACTIVE |                                      |
| 658a7d3b-4c58-4e29-b339-2509cca0de10 | Ubuntu 15.04 (Vivid Vervet) (PVHVM)                          | ACTIVE |                                      |
| faad95b7-396d-483e-b4ae-77afec7e7097 | Vyatta Network OS 6.7R9                                      | ACTIVE |                                      |
| ee71e392-12b0-4050-b097-8f75b4071831 | Windows Server 2008 R2 SP1                                   | ACTIVE |                                      |
| 5707f82f-43f0-41e0-8e51-bfb597852825 | Windows Server 2008 R2 SP1 + SQL Server 2008 R2 SP2 Standard | ACTIVE |                                      |
| b684e5a0-11a8-433e-a4b8-046137783e1b | Windows Server 2008 R2 SP1 + SQL Server 2008 R2 SP2 Web      | ACTIVE |                                      |
| d16fd3df-3b24-49ee-ae6a-317f450006e7 | Windows Server 2012                                          | ACTIVE |                                      |
| f495b41d-07e1-44c5-a3e8-65c4412a7eb8 | Windows Server 2012 + SQL Server 2012 SP1 Standard           | ACTIVE |                                      |

flavorRef: is simply referring to what server type to start up, it’s pretty darn simple

$ supernova lon flavor-list

+------------------+-------------------------+-----------+------+-----------+------+-------+-------------+-----------+
| ID               | Name                    | Memory_MB | Disk | Ephemeral | Swap | VCPUs | RXTX_Factor | Is_Public |
+------------------+-------------------------+-----------+------+-----------+------+-------+-------------+-----------+
| 2                | 512MB Standard Instance | 512       | 20   | 0         |      | 1     |             | N/A       |
| 3                | 1GB Standard Instance   | 1024      | 40   | 0         |      | 1     |             | N/A       |
| 4                | 2GB Standard Instance   | 2048      | 80   | 0         |      | 2     |             | N/A       |
| 5                | 4GB Standard Instance   | 4096      | 160  | 0         |      | 2     |             | N/A       |
| 6                | 8GB Standard Instance   | 8192      | 320  | 0         |      | 4     |             | N/A       |
| 7                | 15GB Standard Instance  | 15360     | 620  | 0         |      | 6     |             | N/A       |
| 8                | 30GB Standard Instance  | 30720     | 1200 | 0         |      | 8     |             | N/A       |
| compute1-15      | 15 GB Compute v1        | 15360     | 0    | 0         |      | 8     |             | N/A       |
| compute1-30      | 30 GB Compute v1        | 30720     | 0    | 0         |      | 16    |             | N/A       |
| compute1-4       | 3.75 GB Compute v1      | 3840      | 0    | 0         |      | 2     |             | N/A       |
| compute1-60      | 60 GB Compute v1        | 61440     | 0    | 0         |      | 32    |             | N/A       |
| compute1-8       | 7.5 GB Compute v1       | 7680      | 0    | 0         |      | 4     |             | N/A       |
| general1-1       | 1 GB General Purpose v1 | 1024      | 20   | 0         |      | 1     |             | N/A       |
| general1-2       | 2 GB General Purpose v1 | 2048      | 40   | 0         |      | 2     |             | N/A       |
| general1-4       | 4 GB General Purpose v1 | 4096      | 80   | 0         |      | 4     |             | N/A       |
| general1-8       | 8 GB General Purpose v1 | 8192      | 160  | 0         |      | 8     |             | N/A       |
| io1-120          | 120 GB I/O v1           | 122880    | 40   | 1200      |      | 32    |             | N/A       |
| io1-15           | 15 GB I/O v1            | 15360     | 40   | 150       |      | 4     |             | N/A       |
| io1-30           | 30 GB I/O v1            | 30720     | 40   | 300       |      | 8     |             | N/A       |
| io1-60           | 60 GB I/O v1            | 61440     | 40   | 600       |      | 16    |             | N/A       |
| io1-90           | 90 GB I/O v1            | 92160     | 40   | 900       |      | 24    |             | N/A       |
| memory1-120      | 120 GB Memory v1        | 122880    | 0    | 0         |      | 16    |             | N/A       |
| memory1-15       | 15 GB Memory v1         | 15360     | 0    | 0         |      | 2     |             | N/A       |
| memory1-240      | 240 GB Memory v1        | 245760    | 0    | 0         |      | 32    |             | N/A       |
| memory1-30       | 30 GB Memory v1         | 30720     | 0    | 0         |      | 4     |             | N/A       |
| memory1-60       | 60 GB Memory v1         | 61440     | 0    | 0         |      | 8     |             | N/A       |
| performance1-1   | 1 GB Performance        | 1024      | 20   | 0         |      | 1     |             | N/A       |
| performance1-2   | 2 GB Performance        | 2048      | 40   | 20        |      | 2     |             | N/A       |
| performance1-4   | 4 GB Performance        | 4096      | 40   | 40        |      | 4     |             | N/A       |
| performance1-8   | 8 GB Performance        | 8192      | 40   | 80        |      | 8     |             | N/A       |
| performance2-120 | 120 GB Performance      | 122880    | 40   | 1200      |      | 32    |             | N/A       |
| performance2-15  | 15 GB Performance       | 15360     | 40   | 150       |      | 4     |             | N/A       |
| performance2-30  | 30 GB Performance       | 30720     | 40   | 300       |      | 8     |             | N/A       |
| performance2-60  | 60 GB Performance       | 61440     | 40   | 600       |      | 16    |             | N/A       |
| performance2-90  | 90 GB Performance       | 92160     | 40   | 900       |      | 24    |             | N/A       |
+------------------+-------------------------+-----------+------+-----------+------+-------+-------------+-----------+

Cloud Files Container Bulk Deletion Script written in BASH

So, we had a lot of customers asking for ways to delete all of their cloud files in a single container, instead of having to do manually. This is possible using the bulk delete function defined in the rackspace docs. Find below the steps required to do this.

Step 1: Make an auth.json file (for simplicity)

{
    "auth": {
        "RAX-KSKEY:apiKeyCredentials": {
            "username": "mycloudusername",
            "apiKey": "mycloudapikey"
        }
    }
}

It’s quite simple and nothing intimidating.

For step 2 I’m using an application called jq, to install it do


wget https://github.com/stedolan/jq/releases/download/jq-1.5/jq-linux64
mv jq-linux64 /bin/jq
alias jq = '/bin/jq'

Now you can use jq at the commandline.

Step 2: Set variable called $TOKEN that can store the api token password output, the nice thing is there is no token stored in the script so its kind of secure

TOKEN=`curl https://identity.api.rackspacecloud.com/v2.0/tokens -X POST -d @auth.json -H "Content-type: application/json" | jq .access.token.id | sed 's/"//g'`
echo $TOKEN

Step 3: Set a variable for the container name

# Container to Upload to
CONTAINER=meh2

Step 4: Populate a List of all the files in the $CONTAINER variable, in this case ‘meh2’.

# Populate File List
echo "Populating File List"
curl -X GET https://storage101.lon3.clouddrive.com/v1/MossoCloudFS_10045567/meh2 -H "X-Auth-Token: $TOKEN" > filelist.txt

Step 5: Add container name to the file listing by rewriting the output file filelist.txt to a deletelist.txt

sed -e "s/^/\/$CONTAINER\//" <  filelist.txt > deletelist.txt

Step 6: Bulk Delete Files thru API

echo "Deleting Files.."
curl -i -v -XDELETE -H"x-auth-token: $TOKEN" https://storage101.lon3.clouddrive.com/v1/MossoCloudFS_10045567\?bulk-delete -T ./deletelist.txt

Step 7: Confirm the deletion success

# Confirm Deleted
echo "Confirming Deleted in $CONTAINER.."
curl -i -X GET https://storage101.lon3.clouddrive.com/v1/MossoCloudFS_10045567/meh2 -H "X-Auth-Token: $TOKEN"

The completed script looks like this:


 Mass Delete Container

# Get Token

TOKEN=`curl https://identity.api.rackspacecloud.com/v2.0/tokens -X POST -d @auth.json -H "Content-type: application/json" | jq .access.token.id | sed 's/"//g'`
echo $TOKEN

# Container to Upload to
CONTAINER=meh2


# Populate File List
echo "Populating File List"
curl -X GET https://storage101.lon3.clouddrive.com/v1/MossoCloudFS_10045567/meh2 -H "X-Auth-Token: $TOKEN" > filelist.txt


# Add Container Prefix
echo "Adding Container Prefix.."
sed -e "s/^/\/$CONTAINER\//" <  filelist.txt > deletelist.txt


# Delete Files
echo "Deleting Files.."
curl -i -v -XDELETE -H"x-auth-token: $TOKEN" https://storage101.lon3.clouddrive.com/v1/MossoCloudFS_10045567\?bulk-delete -T ./deletelist.txt

# Confirm Deleted
echo "Confirming Deleted in $CONTAINER.."
curl -i -X GET https://storage101.lon3.clouddrive.com/v1/MossoCloudFS_10045567/meh2 -H "X-Auth-Token: $TOKEN"

Pretty simple!

Running it..

* About to connect() to storage101.lon3.clouddrive.com port 443 (#0)
* Trying 2a00:1a48:7900::100...
* Connected to storage101.lon3.clouddrive.com (2a00:1a48:7900::100) port 443 (#0)
* Initializing NSS with certpath: sql:/etc/pki/nssdb
* CAfile: /etc/pki/tls/certs/ca-bundle.crt
CApath: none
* SSL connection using TLS_DHE_RSA_WITH_AES_256_CBC_SHA
* Server certificate:
* subject: CN=storage101.lon3.clouddrive.com
* start date: May 18 00:00:00 2015 GMT
* expire date: Nov 17 23:59:59 2016 GMT
* common name: storage101.lon3.clouddrive.com
* issuer: CN=thawte DV SSL CA - G2,OU=Domain Validated SSL,O="thawte, Inc.",C=US
> DELETE /v1/MossoCloudFS_10045567?bulk-delete HTTP/1.1
> User-Agent: curl/7.29.0
> Host: storage101.lon3.clouddrive.com
> Accept: */*
> x-auth-token: AAA7uz-F91SDsaMOCKTOKEN-gOLeB5bbffh8GBGwAPl9F313Pcy4Xg_zP8jtgZolMOudXhsZh-nh9xjBbOfVssaSx_shBMqkxIEEgW1zt8xESJbZLIsvBTNzfVBlTitbUS4RarUOiXEw
> Content-Length: 515
> Expect: 100-continue
>
< HTTP/1.1 100 Continue HTTP/1.1 100 Continue * We are completely uploaded and fine < HTTP/1.1 200 OK HTTP/1.1 200 OK < Content-Type: text/plain Content-Type: text/plain < X-Trans-Id: tx010194ea9a104443b89bb-00161f7f1dlon3 X-Trans-Id: tx010194ea9a104443b89bb-001611f7f1dlon3 < Date: Thu, 15 Oct 2015 10:25:35 GMT Date: Thu, 15 Oct 2015 10:25:35 GMT < Transfer-Encoding: chunked Transfer-Encoding: chunked < Number Deleted: 44 Number Not Found: 0 Response Body: Response Status: 200 OK Errors: * Connection #0 to host storage101.lon3.clouddrive.com left intact

BASH Script to Upload Directory to a Cloud Files Container automatically

Hi guys. So I was working with cloud files API and I thought I would put together a piece of code that allows uploads of an entire file structure to a cloud files container. It won’t work with sub directories yet, but it’s simple enough to give anyone a better understanding of how this works. Please note the token I am using is not a real genuine token.

!/bin/sh

# This Scripts Uploads an entire file structure to a cloud files container

# CLOUD FILES TOKEN
TOKEN='AAAjsa_x-Pe2YuyHVM7kuS-A67LcZNx4-MOCKTOKENjZ1GoLTwVKcQhyE9t-gZIIBMknJBEtD2JbJbWS4W1Pd7wJqXfxgN2ykVSfhcga1ch-vwBFAvlsjMj-ew6eMSG-TyEG7Q_ABC231'


# Folder to Upload FROM
FILES=/root/cloud-files/files/*

# Container to Upload to
CONTAINER=meh2


for f in $FILES
do

echo "Upload start $f ..."
FILENAME=`basename $f`
# take action on each file

curl -i -X PUT https://storage101.lon3.clouddrive.com/v1/MossoCloudFS_10045567/meh2/$FILENAME -T /root/cloud-files/files/$FILENAME -H "X-Auth-Token: $TOKEN"

done

Restarting a Xen Server that is out of memory thru Hypervisor

So, you have a xen server, but the virtual machine is not responding, what do you do? You login to the hypervisor and fix it, all right!

Please note for sanitation that random strings have been used instead of real life UUID.

Step 1: Connect Hypervisor

ssh root@somehypervisoriporhostname

Step 2: Check Running Tasks (Task List)

[root@10-1-1-1 ~]# xe task-list
uuid ( RO)                : ff9ca1a3-fc29-a245-1f28-2adc646114a2
          name-label ( RO): Async.VM.clean_reboot
    name-description ( RO):
              status ( RO): pending
            progress ( RO): 0.371


uuid ( RO)                : aff56852-6db4-1ab3-b2b1-33e48c797dbb
          name-label ( RO): Connection to VM console
    name-description ( RO):
              status ( RO): pending
            progress ( RO): 0.000


[root@10-1-1-1 ~]# xe task-list params=all
uuid ( RO)                  : ff9ca1a3-fc29-a245-1f28-2adc646114a2
            name-label ( RO): Async.VM.clean_reboot
      name-description ( RO):
            subtask_of ( RO): 
              subtasks ( RO):
           resident-on ( RO): 43b6096b-09cd-4890-b51b-56e50de573ff
                status ( RO): pending
              progress ( RO): 0.372
                  type ( RO): 
                result ( RO):
               created ( RO): 20151014T15:01:17Z
              finished ( RO): 19700101T00:00:00Z
            error_info ( RO):
    allowed_operations ( RO): Cancel


uuid ( RO)                  : aff56852-6db4-1ab3-b2b1-33e48c797dbb
            name-label ( RO): Connection to VM console
      name-description ( RO):
            subtask_of ( RO): 
              subtasks ( RO):
           resident-on ( RO): 43b6096b-09cd-4890-b51b-56e50de573ff
                status ( RO): pending
              progress ( RO): 0.000
                  type ( RO): 
                result ( RO):
               created ( RO): 20151014T15:57:48Z
              finished ( RO): 19700101T00:00:00Z
            error_info ( RO):
    allowed_operations ( RO):

I could see that there were two tasks running on this slice:

[root@10-1-1-1 ~]# xe vm-list name-label=slice10011111
uuid ( RO)           : 4a9a5dfb-3c4a-b2bb-be7b-db3be6297fff
     name-label ( RW): slice10011111
    power-state ( RO): running

This told me that the slice was running OK. So I am going to cancel the task pending for it


$ xe task-cancel uuid=ff9ca1a3-fc29-a245-1f28-2adc646114a2

Shutdown the server (HALT IT)


[root@10-1-1-1 ~]# xe vm-shutdown --force uuid=4a9a5dfb-3c4a-b2bb-be7b-db3be6297fff
[root@10-1-1-1 ~]# xe vm-list name-label=slice10011111
uuid ( RO)           : 4a9a5dfb-3c4a-b2bb-be7b-db3be6297fff
     name-label ( RW): slice10011111
    power-state ( RO): halted

Start the Virtual Machine

[root@10-1-1-1 ~]# xe vm-start uuid=4a9a5dfb-3c4a-b2bb-be7b-db3be6297fff

At the end I wanted to check if the instance was still causing a large swap as it was when it was running out of memory! That is the reason why I had to start the server.

(echo "Slice IO_Read IO_Write Total"; (for uuid in $(xe vbd-list params=uuid | awk '$5{print $5}'); do xe vbd-param-list uuid=$uuid | grep -P "^\s*(io_|vm-name-label|vdi-name-label|vdi-uuid|device)" | awk '{if($1=="vdi-uuid") {hasswap="no";vdi_uuid=$4;}}{if($1=="vm-name-label") name=$4; if($1=="vdi-name-label") {if ($4 ~ /swap/) {hasswap="yes";name=name"-swap"}; if ($5 ~ /ephemeral/) name=name"-eph";} if($1=="device"){if($4=="hda" || $4=="xvda") name=name"-root"; if($4=="xvdc" && hasswap=="no") {vdicmd="xe vdi-list uuid="vdi_uuid" params=name-description --minimal | grep swap >> /dev/null"; swpname=system(vdicmd); if(swpname==0) name=name"-swap"};} if($1=="io_read_kbs") ioread=$4; if($1=="io_write_kbs") iowrite=$4}END{if(substr(name,0,9)!="XenServer") print name" "ioread" "iowrite" "ioread+iowrite}'; done) | sort -k4n) | column -t

Job done!

Extending Disk Sizes with LVM

A lot of customers ask the question of how to have a data volume that can be incrementally increased in size vertically over a period of time. Here is how to setup a server like that from start to finish.

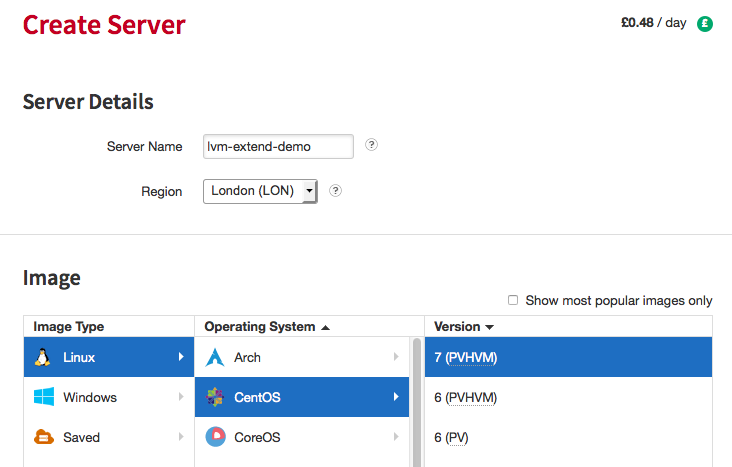
Step 1. Create Rackspace Cloud server
Screen Shot 2015-10-12 at 11.21.40 AM

Click create server at bottom left once you are happy with the distribution you want to use:

Screen Shot 2015-10-12 at 11.24.22 AM

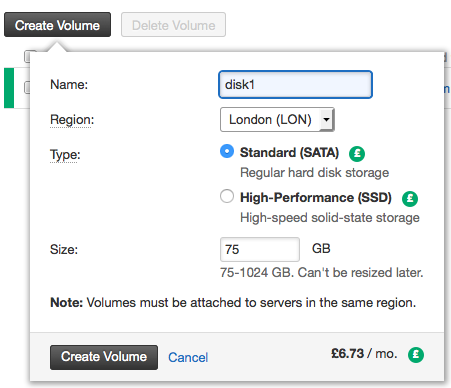
Step 2. Create Cloud Block Storage Volumes. In this case I’m going to create 3 x 75 Gig disks.
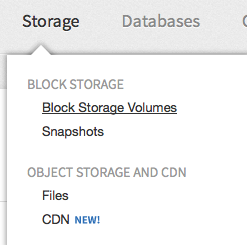
Screen Shot 2015-10-12 at 11.25.30 AM

Screen Shot 2015-10-12 at 11.26.27 AM

Screen Shot 2015-10-12 at 11.26.53 AM

Now your done creating your server and the volumes you are going to use with it. We could have just added 1 Cloud block storage volume, and added the others later, but for this demo, we’re going to show you how to extend the initial partition with the space capacity of the other 2.

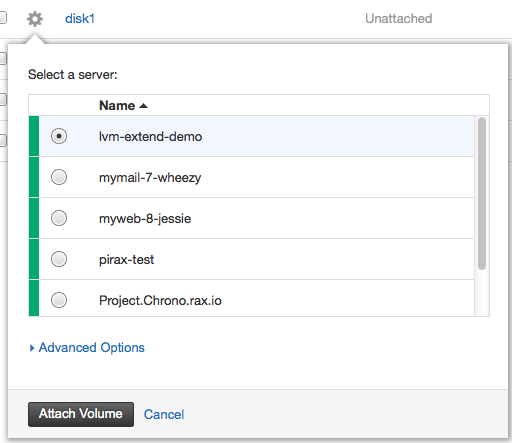
Step 3. Attach your Cloud Block Storage Volumes to the server:
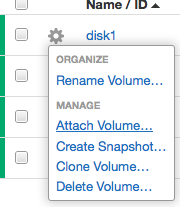
Screen Shot 2015-10-12 at 11.30.05 AM

Screen Shot 2015-10-12 at 11.30.25 AM

Step 4. Login to your Cloud Server

$ ssh [email protected]
The authenticity of host '37.188.1.1 (37.188.1.1)' can't be established.
RSA key fingerprint is 51:e9:e6:c1:4b:f8:24:9f:2a:8a:36:ec:bf:47:23:d4.
Are you sure you want to continue connecting (yes/no)? yes
Warning: Permanently added '37.188.1.1' (RSA) to the list of known hosts.
Last login: Thu Jan  1 00:00:10 1970

Step 5. Run fdisk -l (list) to see attached volumes to server

Disk /dev/xvdc: 536 MB, 536870912 bytes, 1048576 sectors
Units = sectors of 1 * 512 = 512 bytes
Sector size (logical/physical): 512 bytes / 512 bytes
I/O size (minimum/optimal): 512 bytes / 512 bytes
Disk label type: dos
Disk identifier: 0x0004ece3

Device Boot Start End Blocks Id System
/dev/xvdc1 2048 1048575 523264 83 Linux

Disk /dev/xvda: 21.5 GB, 21474836480 bytes, 41943040 sectors
Units = sectors of 1 * 512 = 512 bytes
Sector size (logical/physical): 512 bytes / 512 bytes
I/O size (minimum/optimal): 512 bytes / 512 bytes
Disk label type: dos
Disk identifier: 0x000b1244

Device Boot Start End Blocks Id System
/dev/xvda1 * 2048 41943039 20970496 83 Linux

Disk /dev/xvdb: 80.5 GB, 80530636800 bytes, 157286400 sectors
Units = sectors of 1 * 512 = 512 bytes
Sector size (logical/physical): 512 bytes / 512 bytes
I/O size (minimum/optimal): 512 bytes / 512 bytes

Disk /dev/xvdd: 80.5 GB, 80530636800 bytes, 157286400 sectors
Units = sectors of 1 * 512 = 512 bytes
Sector size (logical/physical): 512 bytes / 512 bytes
I/O size (minimum/optimal): 512 bytes / 512 bytes

I actually discovered at this point that CentOS 7 only supports 3 virtual disks as standard. I’m having the issue because the Rackspace centOS 7 image is shipping with HVM which is causing the issues, if it was just PV type we would be okay. You should switch to a PV version of CentOS now if you want more than 3 virtual disks with your Rackspace Cloud Server.

Step 5: Running the same command on a CentOS 6 PV server allows me to add more disks thru the control panel

[root@lvm-extend-test ~]# fdisk -l

Disk /dev/xvdc: 536 MB, 536870912 bytes
70 heads, 4 sectors/track, 3744 cylinders
Units = cylinders of 280 * 512 = 143360 bytes
Sector size (logical/physical): 512 bytes / 512 bytes
I/O size (minimum/optimal): 512 bytes / 512 bytes
Disk identifier: 0x000f037d

    Device Boot      Start         End      Blocks   Id  System
/dev/xvdc1               8        3745      523264   83  Linux

Disk /dev/xvda: 21.5 GB, 21474836480 bytes
255 heads, 63 sectors/track, 2610 cylinders
Units = cylinders of 16065 * 512 = 8225280 bytes
Sector size (logical/physical): 512 bytes / 512 bytes
I/O size (minimum/optimal): 512 bytes / 512 bytes
Disk identifier: 0x0003e086

    Device Boot      Start         End      Blocks   Id  System
/dev/xvda1   *           1        2611    20970496   83  Linux

Disk /dev/xvdb: 80.5 GB, 80530636800 bytes
255 heads, 63 sectors/track, 9790 cylinders
Units = cylinders of 16065 * 512 = 8225280 bytes
Sector size (logical/physical): 512 bytes / 512 bytes
I/O size (minimum/optimal): 512 bytes / 512 bytes
Disk identifier: 0x00000000


Disk /dev/xvdd: 80.5 GB, 80530636800 bytes
255 heads, 63 sectors/track, 9790 cylinders
Units = cylinders of 16065 * 512 = 8225280 bytes
Sector size (logical/physical): 512 bytes / 512 bytes
I/O size (minimum/optimal): 512 bytes / 512 bytes
Disk identifier: 0x00000000


Disk /dev/xvde: 80.5 GB, 80530636800 bytes
255 heads, 63 sectors/track, 9790 cylinders
Units = cylinders of 16065 * 512 = 8225280 bytes
Sector size (logical/physical): 512 bytes / 512 bytes
I/O size (minimum/optimal): 512 bytes / 512 bytes
Disk identifier: 0x00000000


Disk /dev/xvdf: 80.5 GB, 80530636800 bytes
255 heads, 63 sectors/track, 9790 cylinders
Units = cylinders of 16065 * 512 = 8225280 bytes
Sector size (logical/physical): 512 bytes / 512 bytes
I/O size (minimum/optimal): 512 bytes / 512 bytes
Disk identifier: 0x00000000


Disk /dev/xvdg: 80.5 GB, 80530636800 bytes
255 heads, 63 sectors/track, 9790 cylinders
Units = cylinders of 16065 * 512 = 8225280 bytes
Sector size (logical/physical): 512 bytes / 512 bytes
I/O size (minimum/optimal): 512 bytes / 512 bytes
Disk identifier: 0x00000000

Many disks are now available, we can see them by running:

[root@lvm-extend-test ~]# ls /dev/xv*
/dev/xvda  /dev/xvda1  /dev/xvdb  /dev/xvdc  /dev/xvdc1  /dev/xvdd  /dev/xvde  /dev/xvdf  /dev/xvdg

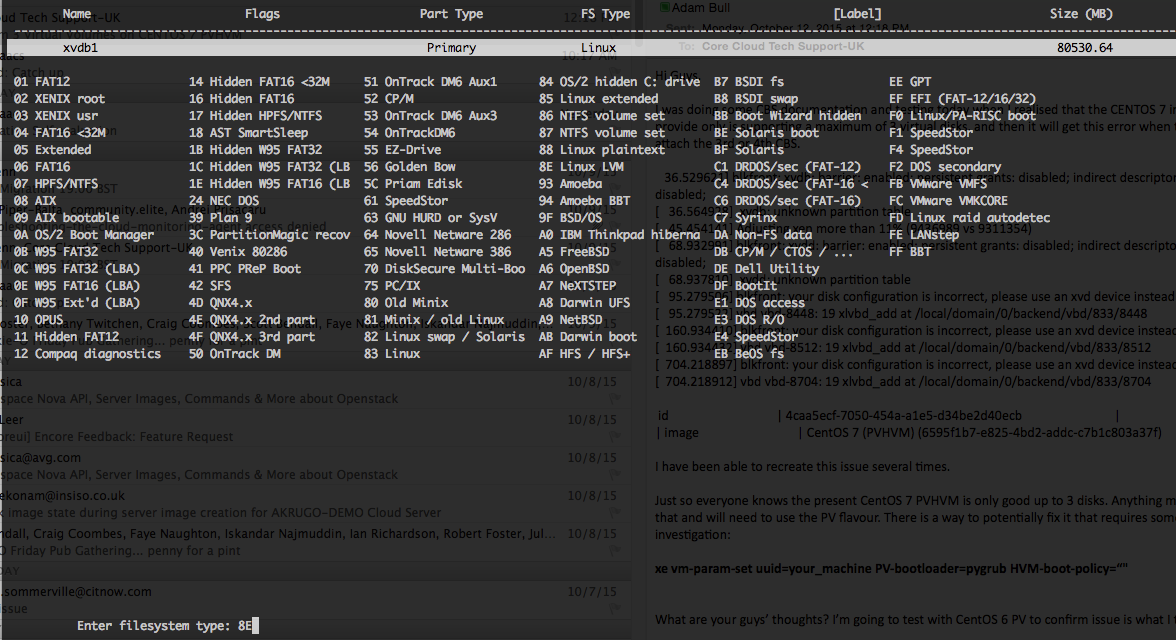
Step 6: Run cfdisk and start partitioning each disk.

cfdisk /dev/xvdb

Create New PartitionScreen Shot 2015-10-12 at 12.24.14 PMof Primary Partition Type

Screen Shot 2015-10-12 at 12.24.23 PMUsing maximum space available

Screen Shot 2015-10-12 at 12.24.29 PM

Using type 8E LVM Filesystem TYPE

Screen Shot 2015-10-12 at 12.24.44 PM

Write partition data:
Screen Shot 2015-10-12 at 12.27.40 PM

Step 7: Repeat this for any additional block storage disks you may have. I have a total of 5 CBS volumes, so I need to repeat this another 4 times.

<pre>

cfdisk /dev/xvdc
cfdisk /dev/xvde
cfdisk /dev/xvdf
cfdisk /dev/xvdg

Step 8: Verify that the partitions exist. (check each one has a 1 on the end now)

[root@lvm-extend-test ~]# ls /dev/xvd*
/dev/xvda  /dev/xvda1  /dev/xvdb  /dev/xvdb1  /dev/xvdc  /dev/xvdc1  /dev/xvdd  /dev/xvdd1  /dev/xvde  /dev/xvde1  /dev/xvdf  /dev/xvdf1  /dev/xvdg  /dev/xvdg1

Step 9: Install LVM

 yum install lvm2 

Step 10: Create first physical volume

[root@lvm-extend-test ~]# pvcreate /dev/xvdb1
  Physical volume "/dev/xvdb1" successfully created

Step 11: Check Physical Volume

 [root@lvm-extend-test ~]# pvdisplay
  "/dev/xvdb1" is a new physical volume of "75.00 GiB"
  --- NEW Physical volume ---
  PV Name               /dev/xvdb1
  VG Name
  PV Size               75.00 GiB
  Allocatable           NO
  PE Size               0
  Total PE              0
  Free PE               0
  Allocated PE          0
  PV UUID               7Vv8Rf-hRIr-b7Cb-aaxY-baeg-zVKR-BblJij 

Step 11: Create a volume group on the first physical volume and give it a name DataGroup00

[root@lvm-extend-test ~]# vgcreate DataGroup00 /dev/xvdb1
  Volume group "DataGroup00" successfully created

[root@lvm-extend-test ~]# vgdisplay
  --- Volume group ---
  VG Name               DataGroup00
  System ID
  Format                lvm2
  Metadata Areas        1
  Metadata Sequence No  1
  VG Access             read/write
  VG Status             resizable
  MAX LV                0
  Cur LV                0
  Open LV               0
  Max PV                0
  Cur PV                1
  Act PV                1
  VG Size               75.00 GiB
  PE Size               4.00 MiB
  Total PE              19199
  Alloc PE / Size       0 / 0
  Free  PE / Size       19199 / 75.00 GiB
  VG UUID               Gm00iH-2a15-HO8K-Pbnj-80oh-E2Et-LE1Y2A

Currently the disk is 75GB. We now want to expand/extend with LVM the size of the disk. Doing this is simple enough.

Step 12: Extend Volume size with LVM

[root@lvm-extend-test ~]# vgextend DataGroup00 /dev/xvdd1
  Physical volume "/dev/xvdd1" successfully created
  Volume group "DataGroup00" successfully extended
[root@lvm-extend-test ~]# vgdisplay
  --- Volume group ---
  VG Name               DataGroup00
  System ID
  Format                lvm2
  Metadata Areas        2
  Metadata Sequence No  2
  VG Access             read/write
  VG Status             resizable
  MAX LV                0
  Cur LV                0
  Open LV               0
  Max PV                0
  Cur PV                2
  Act PV                2
  VG Size               149.99 GiB
  PE Size               4.00 MiB
  Total PE              38398
  Alloc PE / Size       0 / 0
  Free  PE / Size       38398 / 149.99 GiB
  VG UUID               Gm00iH-2a15-HO8K-Pbnj-80oh-E2Et-LE1Y2A

Now we can see we got double the space! Lets keep extending it.

Step 13: Extend Volume size again with LVM some more.

[root@lvm-extend-test ~]# vgextend DataGroup00 /dev/xvde1
  Physical volume "/dev/xvde1" successfully created
  Volume group "DataGroup00" successfully extended
[root@lvm-extend-test ~]# vgdisplay
  --- Volume group ---
  VG Name               DataGroup00
  System ID
  Format                lvm2
  Metadata Areas        3
  Metadata Sequence No  3
  VG Access             read/write
  VG Status             resizable
  MAX LV                0
  Cur LV                0
  Open LV               0
  Max PV                0
  Cur PV                3
  Act PV                3
  VG Size               224.99 GiB
  PE Size               4.00 MiB
  Total PE              57597
  Alloc PE / Size       0 / 0
  Free  PE / Size       57597 / 224.99 GiB
  VG UUID               Gm00iH-2a15-HO8K-Pbnj-80oh-E2Et-LE1Y2A

[root@lvm-extend-test ~]# vgextend DataGroup00 /dev/xvdf1
  Physical volume "/dev/xvdf1" successfully created
  Volume group "DataGroup00" successfully extended
[root@lvm-extend-test ~]# vgdisplay
  --- Volume group ---
  VG Name               DataGroup00
  System ID
  Format                lvm2
  Metadata Areas        4
  Metadata Sequence No  4
  VG Access             read/write
  VG Status             resizable
  MAX LV                0
  Cur LV                0
  Open LV               0
  Max PV                0
  Cur PV                4
  Act PV                4
  VG Size               299.98 GiB
  PE Size               4.00 MiB
  Total PE              76796
  Alloc PE / Size       0 / 0
  Free  PE / Size       76796 / 299.98 GiB
  VG UUID               Gm00iH-2a15-HO8K-Pbnj-80oh-E2Et-LE1Y2A

[root@lvm-extend-test ~]# vgextend DataGroup00 /dev/xvdg1
  Physical volume "/dev/xvdg1" successfully created
  Volume group "DataGroup00" successfully extended
[root@lvm-extend-test ~]# vgdisplay
  --- Volume group ---
  VG Name               DataGroup00
  System ID
  Format                lvm2
  Metadata Areas        5
  Metadata Sequence No  5
  VG Access             read/write
  VG Status             resizable
  MAX LV                0
  Cur LV                0
  Open LV               0
  Max PV                0
  Cur PV                5
  Act PV                5
  VG Size               374.98 GiB
  PE Size               4.00 MiB
  Total PE              95995
  Alloc PE / Size       0 / 0
  Free  PE / Size       95995 / 374.98 GiB
  VG UUID               Gm00iH-2a15-HO8K-Pbnj-80oh-E2Et-LE1Y2A

Now we are at 374.98GB Capacity. 5 x 75GB. No problems at all! Imagine if you were doing this with 1000GIG volumes. You could put yourself together a pretty tight CBS. The thing i’d be worried bout was data loss though. So you’d want a server identical to this, with rsync setup across the two for some level of redundancy. and you’d want it, preferably in a completely different datacentre, too.

Last thing now. Actually creating the ext4 filesystem on this volumegroup. We’ve partitioned so that the disk can be used. We’ve created volume and group so that disks can be assigned to the OS as a disk. Now we need to format it with the filesystem. So lets take some steps to do that:

Step 13: Create Logical Volume and Verify


[root@lvm-extend-test ~]# lvcreate -l +100%FREE DataGroup00 -n data
  Logical volume "data" created.

[root@lvm-extend-test ~]# lvdisplay
  --- Logical volume ---
  LV Path                /dev/DataGroup00/data
  LV Name                data
  VG Name                DataGroup00
  LV UUID                JGTRSg-JdNm-aumq-wJFC-VHVb-Sdm9-VVfp5c
  LV Write Access        read/write
  LV Creation host, time lvm-extend-test, 2015-10-12 11:53:45 +0000
  LV Status              available
  # open                 0
  LV Size                374.98 GiB
  Current LE             95995
  Segments               5
  Allocation             inherit
  Read ahead sectors     auto
  - currently set to     256
  Block device           253:0

Step 14: Make Volume Active

[root@lvm-extend-test ~]# vgscan
  Reading all physical volumes.  This may take a while...
  Found volume group "DataGroup00" using metadata type lvm2

Step 15: Create Filesystem on physical volume

[root@lvm-extend-test ~]# mkfs.ext4 /dev/mapper/DataGroup00-data
mke2fs 1.41.12 (17-May-2010)
Filesystem label=
OS type: Linux
Block size=4096 (log=2)
Fragment size=4096 (log=2)
Stride=0 blocks, Stripe width=0 blocks
24576000 inodes, 98298880 blocks
4914944 blocks (5.00%) reserved for the super user
First data block=0
Maximum filesystem blocks=4294967296
3000 block groups
32768 blocks per group, 32768 fragments per group
8192 inodes per group
Superblock backups stored on blocks:
	32768, 98304, 163840, 229376, 294912, 819200, 884736, 1605632, 2654208,
	4096000, 7962624, 11239424, 20480000, 23887872, 71663616, 78675968

Writing inode tables: done
Creating journal (32768 blocks): done
Writing superblocks and filesystem accounting information: done

This filesystem will be automatically checked every 30 mounts or
180 days, whichever comes first.  Use tune2fs -c or -i to override.

Step 16: Making a moint point folder

 mkdir /lvm-data

Step 17: Update your fstab (TAKE CARE) so that the disk is attached to the required on boot


[root@lvm-extend-test ~]# vi /etc/fstab

# Required line 
/dev/mapper/DataGroup00-data    /lvm-data           ext4    defaults        0 0

Step 18: Mount the LVM

[root@lvm-extend-test ~]# mount /lvm-data
[root@lvm-extend-test ~]#

There ya go! You have your 375GB Volume! You can extend this at any point! Just simply make a new CBS volume and then repeat the process of mounting it and then extending it.

MySQL Basics

So, I use quite a fair bit of MySQL at work, especially when customer has some issues with their MySQL, anything from tuning and performance analysis to system configuration and solution architecture. I thought I’d put together a little article that had some of the most common commands using MySQL.

Connect to a MySQL server

mysql -u root -p 

Connecting to the local mysql server as root level user and use password authentication. It’s possible to supply the password directly after the -p so you don’t have to type it at the commandline but please don’t do this with the root user!

Display Databases in MySQL

mysql> show databases;
+--------------------+
| Database           |
+--------------------+
| information_schema |
| mystuff            |
| wordpress          |
| mysql              |
| performance_schema |
| somesitedb         |
+--------------------+
6 rows in set (0.00 sec)

Change active database

mysql> use information_schema;

Reading table information for completion of table and column names
You can turn off this feature to get a quicker startup with -A

Database changed

Show tables within active database

mysql> show tables;
+---------------------------------------+
| Tables_in_information_schema          |
+---------------------------------------+
| CHARACTER_SETS                        |
| COLLATIONS                            |
| COLLATION_CHARACTER_SET_APPLICABILITY |
| COLUMNS                               |
| COLUMN_PRIVILEGES                     |
| ENGINES                               |
| EVENTS                                |
| FILES                                 |
| GLOBAL_STATUS                         |
| GLOBAL_VARIABLES                      |
| KEY_COLUMN_USAGE                      |
| PARAMETERS                            |
| PARTITIONS                            |
| PLUGINS                               |
| PROCESSLIST                           |
| PROFILING                             |
| REFERENTIAL_CONSTRAINTS               |
| ROUTINES                              |
| SCHEMATA                              |
| SCHEMA_PRIVILEGES                     |
| SESSION_STATUS                        |
| SESSION_VARIABLES                     |
| STATISTICS                            |
| TABLES                                |
| TABLESPACES                           |
| TABLE_CONSTRAINTS                     |
| TABLE_PRIVILEGES                      |
| TRIGGERS                              |
| USER_PRIVILEGES                       |
| VIEWS                                 |
| INNODB_BUFFER_PAGE                    |
| INNODB_TRX                            |
| INNODB_BUFFER_POOL_STATS              |
| INNODB_LOCK_WAITS                     |
| INNODB_CMPMEM                         |
| INNODB_CMP                            |
| INNODB_LOCKS                          |
| INNODB_CMPMEM_RESET                   |
| INNODB_CMP_RESET                      |
| INNODB_BUFFER_PAGE_LRU                |
+---------------------------------------+
40 rows in set (0.00 sec)

Select all records from a given table

mysql> select * from CHARACTER_SETS;
+--------------------+----------------------+-----------------------------+--------+
| CHARACTER_SET_NAME | DEFAULT_COLLATE_NAME | DESCRIPTION                 | MAXLEN |
+--------------------+----------------------+-----------------------------+--------+
| big5               | big5_chinese_ci      | Big5 Traditional Chinese    |      2 |
| dec8               | dec8_swedish_ci      | DEC West European           |      1 |
| cp850              | cp850_general_ci     | DOS West European           |      1 |
| hp8                | hp8_english_ci       | HP West European            |      1 |
| koi8r              | koi8r_general_ci     | KOI8-R Relcom Russian       |      1 |
| latin1             | latin1_swedish_ci    | cp1252 West European        |      1 |
| latin2             | latin2_general_ci    | ISO 8859-2 Central European |      1 |
| swe7               | swe7_swedish_ci      | 7bit Swedish                |      1 |
| ascii              | ascii_general_ci     | US ASCII                    |      1 |
| ujis               | ujis_japanese_ci     | EUC-JP Japanese             |      3 |
| sjis               | sjis_japanese_ci     | Shift-JIS Japanese          |      2 |
| hebrew             | hebrew_general_ci    | ISO 8859-8 Hebrew           |      1 |
| tis620             | tis620_thai_ci       | TIS620 Thai                 |      1 |
| euckr              | euckr_korean_ci      | EUC-KR Korean               |      2 |
| koi8u              | koi8u_general_ci     | KOI8-U Ukrainian            |      1 |
| gb2312             | gb2312_chinese_ci    | GB2312 Simplified Chinese   |      2 |
| greek              | greek_general_ci     | ISO 8859-7 Greek            |      1 |
| cp1250             | cp1250_general_ci    | Windows Central European    |      1 |
| gbk                | gbk_chinese_ci       | GBK Simplified Chinese      |      2 |
| latin5             | latin5_turkish_ci    | ISO 8859-9 Turkish          |      1 |
| armscii8           | armscii8_general_ci  | ARMSCII-8 Armenian          |      1 |
| utf8               | utf8_general_ci      | UTF-8 Unicode               |      3 |
| ucs2               | ucs2_general_ci      | UCS-2 Unicode               |      2 |
| cp866              | cp866_general_ci     | DOS Russian                 |      1 |
| keybcs2            | keybcs2_general_ci   | DOS Kamenicky Czech-Slovak  |      1 |
| macce              | macce_general_ci     | Mac Central European        |      1 |
| macroman           | macroman_general_ci  | Mac West European           |      1 |
| cp852              | cp852_general_ci     | DOS Central European        |      1 |
| latin7             | latin7_general_ci    | ISO 8859-13 Baltic          |      1 |
| utf8mb4            | utf8mb4_general_ci   | UTF-8 Unicode               |      4 |
| cp1251             | cp1251_general_ci    | Windows Cyrillic            |      1 |
| utf16              | utf16_general_ci     | UTF-16 Unicode              |      4 |
| cp1256             | cp1256_general_ci    | Windows Arabic              |      1 |
| cp1257             | cp1257_general_ci    | Windows Baltic              |      1 |
| utf32              | utf32_general_ci     | UTF-32 Unicode              |      4 |
| binary             | binary               | Binary pseudo charset       |      1 |
| geostd8            | geostd8_general_ci   | GEOSTD8 Georgian            |      1 |
| cp932              | cp932_japanese_ci    | SJIS for Windows Japanese   |      2 |
| eucjpms            | eucjpms_japanese_ci  | UJIS for Windows Japanese   |      3 |
+--------------------+----------------------+-----------------------------+--------+
39 rows in set (0.00 sec)

Create a database

mysql> CREATE database testdb;
Query OK, 1 row affected (0.00 sec)

mysql> show databases;
+--------------------+
| Database           |
+--------------------+
| information_schema |
| mystuff            |
| wordpress          |
| mysql              |
| performance_schema |
| somesitedb         |
| testdb             |
+--------------------+
7 rows in set (0.00 sec)

Display/Describe Table Fields

mysql> describe character_sets;
+----------------------+-------------+------+-----+---------+-------+
| Field                | Type        | Null | Key | Default | Extra |
+----------------------+-------------+------+-----+---------+-------+
| CHARACTER_SET_NAME   | varchar(32) | NO   |     |         |       |
| DEFAULT_COLLATE_NAME | varchar(32) | NO   |     |         |       |
| DESCRIPTION          | varchar(60) | NO   |     |         |       |
| MAXLEN               | bigint(3)   | NO   |     | 0       |       |
+----------------------+-------------+------+-----+---------+-------+
4 rows in set (0.01 sec)

Deleting a database or a Table

mysql> drop database testdb;
Query OK, 0 rows affected (0.00 sec)

Counting the number of records in a table, in this case wordpress wp_comments

mysql> select COUNT(*) FROM wp_comments
    -> ;
+----------+
| COUNT(*) |
+----------+
|       91 |
+----------+
1 row in set (0.00 sec)

mysql> SELECT COUNT(*) FROM wp_posts;
+----------+
| COUNT(*) |
+----------+
|       56 |
+----------+
1 row in set (0.00 sec)

Create A New MySQL User

mysql -u root -p

mysql> use mysql;
mysql> INSERT INTO user (Host,User,Password) VALUES('%','username',PASSWORD('password'));
mysql> flush privileges; 

Change a MySQL Users password

# mysql -u root -p
mysql> SET PASSWORD FOR 'user'@'hostname' = PASSWORD('passwordhere');
mysql> flush privileges; 

Configuring Fail2Ban on Linux Servers (BLOCK/DROP IP addresses that get SSH or IMAP password wrong more than 3 times)

So, I was figuring, because of all the brute force attacks on my servers that I would bother to install fail2ban. Something even better than this would be to change the port your SSH runs on..

Step 1. Install Fail2ban
Ubuntu and Debian Systems

apt-get install fail2ban

Redhat, Fedora and CentOS based Systems

yum install fail2ban

Step 2. Copy the reference config file and edit it in Vi (or nano)

cp /etc/fail2ban/jail.conf /etc/fail2ban/jail.local
vi /etc/fail2ban/jail.local

Step 3. Configure bantime (default 600seconds), and the max_retry (3 attempts).
If someone tries to connect 3 times or more with the wrong password, they’ll be added to IPTABLES DROP rule for 600 seconds

# "bantime" is the number of seconds that a host is banned.
bantime  = 600

maxretry = 3

By default fail2ban starts banning people on SSH immediately, but I found it was also possible to configure fail2ban to block ip addresses attempting to brute force hack my email accounts, here is how I did it.

[sasl]

enabled  = false
port     = smtp,ssmtp,submission,imap2,imap3,imaps,pop3,pop3s
filter   = postfix-sasl
# You might consider monitoring /var/log/mail.warn instead if you are
# running postfix since it would provide the same log lines at the
# "warn" level but overall at the smaller filesize.
logpath  = /var/log/mail.log

It’s possible to alter this configuration but for most people the logpath for SSH is auth.log

[ssh]

enabled  = true
port     = ssh
filter   = sshd
logpath  = /var/log/auth.log
maxretry = 6

Step 4: Restart the Fail2ban service

# most init.d based systems
/etc/init.d/fail2ban restart
# some systemD systems
service fail2ban restart